Although operation of portable apparatus on the lower frequencies has been restricted, the possibility that such an emergency may arise in which the amateurs may render an invaluable aid is as great as ever. Preparedness to meet such situations is just as essential, if not more so, to-day as it has been in the past. And preparedness is the only effective way of coping with such emergencies. We should not wait until a hurricane strikes or until the rivers have reached flood level before we begin thinking about emergency apparatus. We should have the gear built and ready to go to work before that time arrives. It was with this thought in mind that the transmitter to be described was built.
In designing any radio gear, the us to which it will be put and the conditions under which it will be operated must always be given careful consideration. This is particularly true of emergency equipment. There must be one or more "field" stations located where the emergency exists to establish contact with a "home" station that can readily dispatch the traffic to any point.
On the regular ham bands, any number of "home" stations are usually available; in fact, there are often too many, causing serious difficulty from interference. The weak link in the chain is the fact that, since emergencies are likely to occur at any point or under any conditions without regard to the convenience of radio amateurs, it is very likely that there may not be a "field" station available at a suitable location to accumulate and handle traffic for the area involved. In this case, it becomes necessary to transport a field station quickly to a location where it can be operated most effectively. This point has been brought out more emphatically during disasters in the past five years.
Such equipment should be small and light. It should require a minimum of "gadgets" such as crystals, coils, condensers, etc. It should not require an "instruction book" to get it into operation by amateurs not familiar with that particular apparatus. It should be versatile enough to operate with reasonable efficiency on any type of antenna that may be available or can be hung up quickly. It should be capable of operating from any type of power supply that may be available. This last point is particularly important. It may be possible that a.c. power is still available. Lacking this, operation may be possible from storage battery supplies such as dynamotors or vibrator-packs. If this cannot be obtained or if the location to be reached is such that the transportation of storage batteries is too difficult, it should be possible and practical to operate the apparatus entirely on dry batteries.
The requirements for small size, portability an battery operation rule against 'phone operation. While there may be occasions when the ability to use 'phone may be advantageous, accurate dependable message-handling usually calls for c.w. operation. From the standpoint of portability, much less power and apparatus are required for generating a c.w. signal than for generating a 'phone signal.
|
|
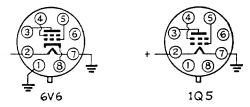
| Fig. 1 — Socket diagrams (bottom view) of the tubes used in the portable-emergency transmitter, showing how the tubes can be used interchangeably. |
The transmitter to be described was designed solely for c.w. transmission. It is small and compact. Two-band operation can be had from a single crystal merely be replacing the output tank coil. A simple, yet effect antenna impedance matching system is provided. Moreover, the transmitter can be operated on an a.c. power pack, a 6-volt storage battery supply using a vibrator pack or dynamotor, or entirely on dry batteries. When using an a.c. pack or storage battery supply two 6V6 (or 6V6-GT) tubes are used with 15 to 20 watts input. When using dry batteries, the above tubes are replaced by 1Q5-GT's using a single 1.5-volt cell for the filaments and about 135 volts on the plates with inputs from 1.5 to 2 watts. The change from 6-volt to 1.5-volt operation is accomplished merely by replacing the tubes and power supply. Figure 1 shows a diagram of the socket connections of the 6V6 and the 1Q5-GT tubes, illustrating how the tubes can be made interchangeable. One side of the heat is grounded and care should be taken that the grounded size corresponds to the negative side of the filament when 1.5-volt tubes are used. A 6F6 could have been used in place of the 6V6 for the crystal oscillator, but the use of the 6V6 gives slightly more output and requires carrying only one type of tube for replacement purposes. The circuit diagram of the transmitter is shown in Figure 2.
|
||
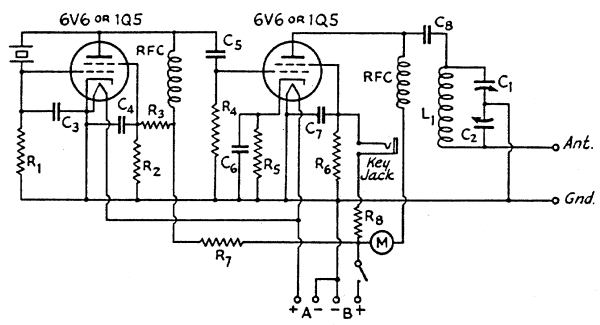
| Fig. 2 — Wiring diagram of the portable-emergency transmitter.
|
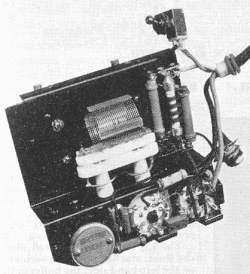
The transmitter is built into a metal cabinet which measures 5¼ by 5¼ by 5½ inches. Everything is mounted on a sub-chassis except the meter, B+ switch, key jack and antenna-ground strip, which are mounted on the cabinet. The sub-chassis is a piece of steel bent to form two platforms as shown in the photographs. The purpose of this chassis shape is to make it possible to utilize all the space inside the cabinet and make a very compact unit. Two angles are bent over at both edges of the chassis by which it is fastened to the cabinet with screws.
The two output tank condensers are mounted on the upper platform. The rotor shafts have been cut off and slotted and are rotated by means of a screwdriver which is inserted through two holes in the side of the cabinet. These condensers are mounted directly on the platform, thereby grounding the rotors. The stators are connected to the tank coil of the opposite side of this platform by two bus-bar leads passing through the rubber grommet near the front.
On the lower platform are mounted two isolantite octal sockets and a socket for the crystal. The tube near the middle is the crystal oscillator and the tube near the end is the output tube.
The r.f. choke mounted above the crystal socket is the plate choke for the crystal oscillator. The two leads dangling above this choke are the meter leads, the meter being mounted on the cabinet in the space directly above this RF choke.
 Looking at the bottom of the platform, several resistors and condensers can be seen mounted in the most direct and convenient spots around the tube sockets. The condenser C8 is mounted on the upper platform between the coil support and the end of the r.f. choke. It will be noticed that the tank coil L1 is mounted on the angle piece between the two platforms. The two bus-bar leads from the tank condensers can be seen coming through the chassis to the coil connections. The National XB-16 coil socket is used as furnished. The coils have been revised somewhat to make it possible to fit them into a smaller space. The link is removed and then the spacers are removed so that the coil fits down against the base. Only the two end prongs are used, the others being removed. A few turns must also be removed from each coil, as specified in the coil data.
At the right of the coil can be seen two 2-watt resistors and an r.f. choke. The outside resistor is R8 while the one nearest the coil is R7. The r.f. choke is the plate choke of the output tube. At the right-hand side can be seen the B+ toggle switch and the keying jack. Both of these mount on the side of the cabinet. The crystal and coil are replaced from the bottom of the cabinet. The tubes are replaced from the top. The antenna-ground strip, which is a National Type FWG, is not shown but is mounted on the cabinet at the left of the coil, and a piece of bus-bar is run over to the left coil connector from the antenna post. The ground post is connected to the chassis by a lug. A four-wire cable supplies the A and B power for the unit.
 The circuit of the transmitter is not particularly new, having been used in similar outfits in the past.1 The circuit consists of a Pierce oscillator which is coupled to the output tube be means of an untuned impedance, followed by an output stage which can be operated either on the fundamental frequency of the crystal or as a frequency doubler. A better means of coupling the output tank to the antenna is used. Although the system is very simple and uses a minimum of parts, it has proved to be very effective over a comparatively wide range of antenna impedances. The antenna loading is adjusted by juggling the relative capacities of the tuning condensers C1 and C2. When C2 is at maximum capacity, the loading will be at a minimum. As this condenser is decreased in capacity, the loading will increase. The capacity of C1 must be adjusted at the same time, of course, to keep the tank circuit tuned to resonance as indicated by minimum plate current. By this juggling process, good coupling can be obtained to practically any reasonable antenna system.
It will be noted that the final amplifier is keyed by opening the screen supply of that tube rather than by opening the cathode. This system produces satisfactory keying and is employed because the use of 1.5-volt tubes makes cathode keying impossible. Break-in could be obtained by keying the crystal tube, although trouble may occur due to the final amplifier oscillating as a crystal oscillator, even with the key up, when operating straight through on the crystal frequency. With the present system, no trouble occurs when operating "straight through."
The transmitter has been thoroughly checked during the past year on the air both at home and in the field including two field days when it was operated by a group of amateurs from the Eastern Massachusetts Amateur Radio Association. On one of these outings the car was driven off the main road, a piece of wire about 60 feet long was attached near the top of a tree and the transmitter was put into operation in the car using a genemotor supply. The report obtained from about 100 miles away was that the signal was just slightly weaker than the 25-watt transmitter being operated back at "headquarters," which used a half-wave single-wire-fed antenna. At another time, the transmitter was operated at home using a 10-meter Zepp antenna with the feeders tied together and with 2 watts input to the 1Q5-GT's. Operation was on 40 meters and a solid half-hour QSO was had with a station in Buffalo, N. Y., at about 9 P. M.
1 Priest and Turner, "Norfolk Amateurs Prepare for Emergencies," QST, Sept. 1938.
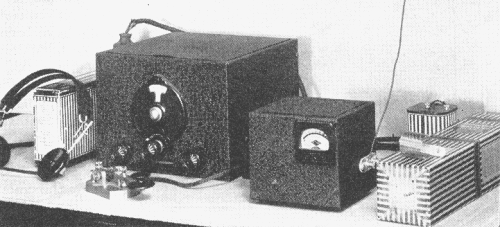
[Title Photo] An idea of the size of the transmitter can be obtained by comparing it with the SW-3 receiver on the left. The transmitter can be operated from dry cells with a few watts input or from a 350-volt supply and about 20 watts input, by simply changing tubes and power supplies.
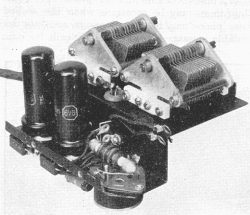
[Photo 2] A top view of the chassis with the cabinet removed.
[Photo 3] A view of the bottom of the chassis. Note that the coil has been lowered on its plug-in mount to give more room.
| From Calvin F. Hadlock, W1CTW, Engineer, National Company, Malden, Mass., "A Versatile Portable-Emergency Transmitter," QST, July 1941 CE, pages 9 through 11. | This transmitter is an example of a Boosted Pierce design. home |